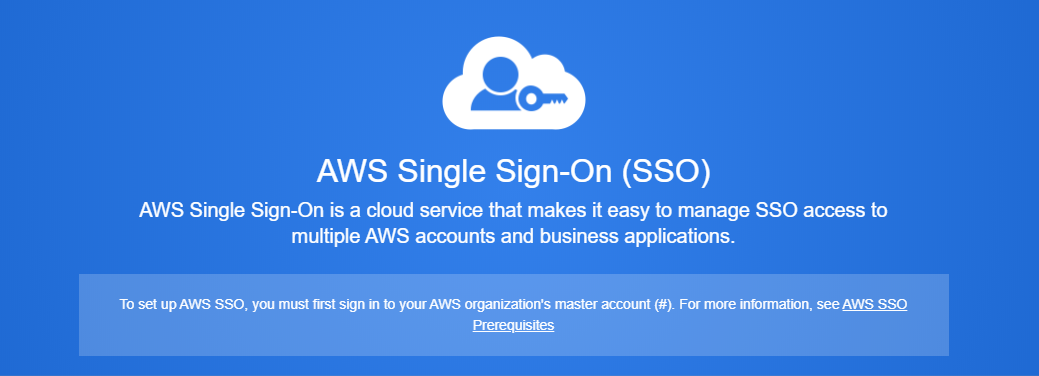
AWS Single Sign-On
Single Sign-On helps everyone lower the overhead of identity management and increase security, but did you know AWS has a single sign-on solution? Let's talk about AWS Single Sign-On and how to configure it with Azure AD.

Now before we get started with AWS Single Sign-On, lets get some terms out of the way.
What is Single Sign-On?
Single sign-on (SSO) is a session and user authentication service that allows a user to use one set of login credentials to access multiple applications.
But what does that really mean?
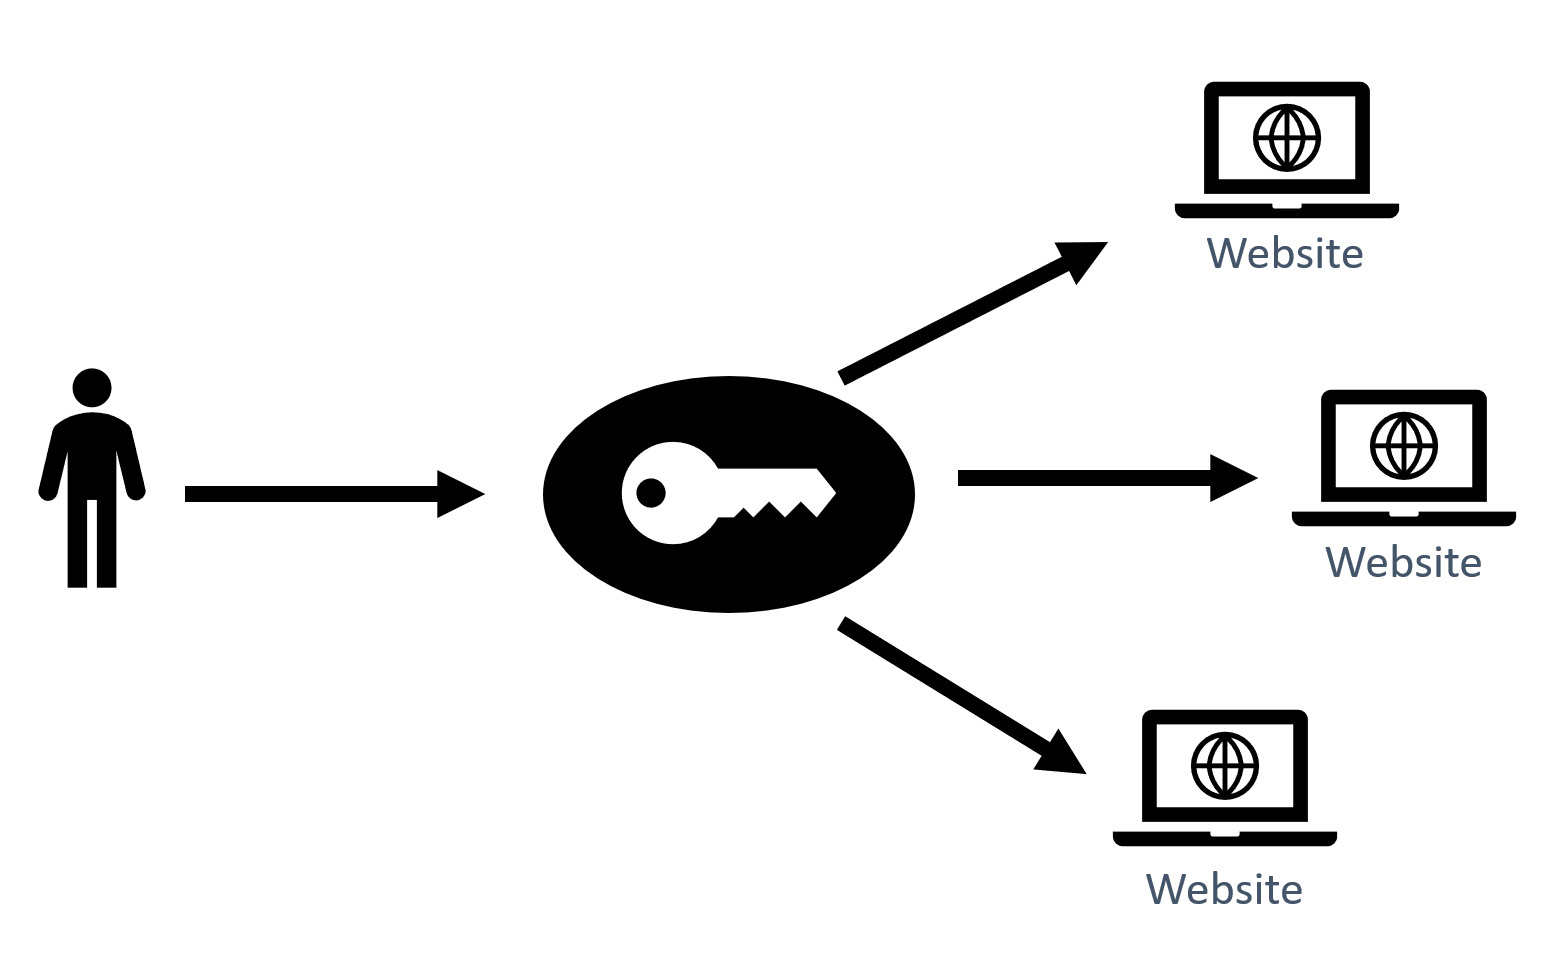
Basically, you just need to login once and now you have access to all of your applications.
What is SAML?
Security Assertion Markup Language (SAML) is an XML-based method for exchanging user security information between an SAML identity provider and a SAML service provider.
Wait..What?
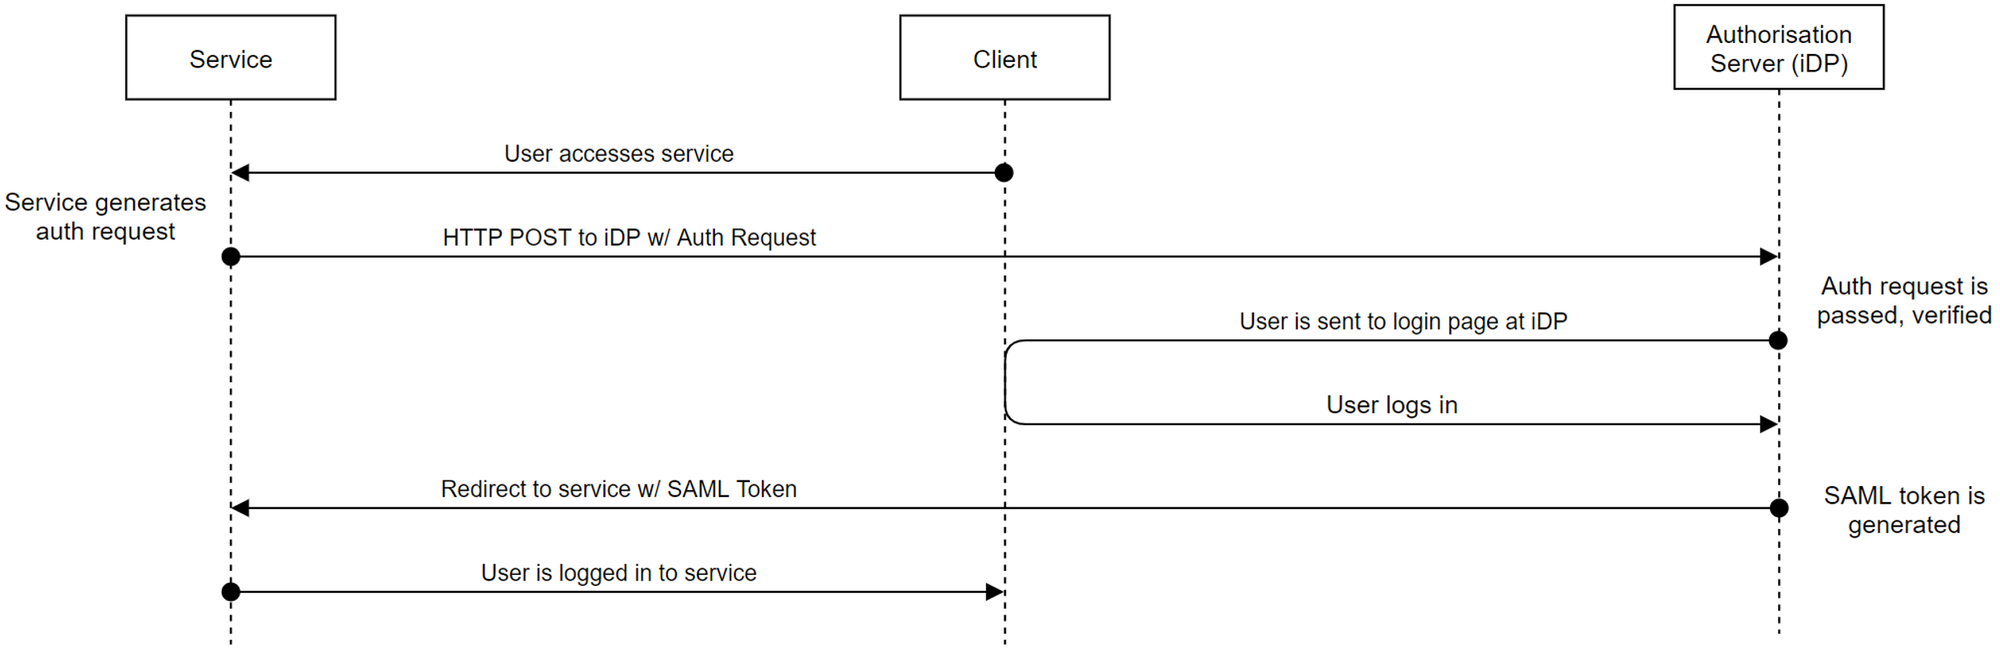
- User accesses the service
- The service redirects the user with a SAML request to the Identity Provider to authenticate
- The Identity Provider authentications the user
- The Identity Provider sends the user back to the service with a SAML response
- The User is logged in to the service
AWS Single Sign-On
Now that we've got those terms out of the way, let's get into AWS SSO.
Features of AWS Single Sign-On
AWS SSO has a lot of awesome features:
- It's integrated with AWS Organizations allowing for easy permissions deployment
- It's able to provide SSO to any SAML v2.0 application
- You can create users directly in AWS SSO's built in user directory or integrate it with your own directory such as Active Directory or Azure AD
- It allows multi-factor authentication which helps protect against credential theft
- It supports automatic provisioning of users
- On the AWS side it provides SSO access via the management console, CLI and programmatic access
- AWS SSO is also fully integrated with CloudTrail giving you full audit capability
Who is AWS SSO for and why should you care?
- AWS SSO can be used by organizations small and large. And by large, I mean up to 50,000 users and 10,000 groups who can then access up to 500 applications
- AWS SSO can be used as a standalone service meaning you don't need other AWS services to use it
- Once setup, you get to manage everything from your identity provider keeping user management simple
- Users just need to care about one username and password, versus multiple credentials meaning they can just make that password a good one and put MFA on too
- The CloudTrail integration gives you visibility of who is logging in and accessing what, allowing you to integrate into any security solution and then report on the good and bad user activity
Now i know what your thinking, Rian, this sounds amazing but I bet it has a expensive monthly cost!
Well.... Nope. Its Free.
Prerequisites
Gettings started with AWS SSO is quite simple.
- We need AWS Organizations with all features enabled
- We need access to the organization master account
- As this is a regional service, we need to choose the region AWS SSO is going to run in. Be aware that you can only rune AWS SSO in ONE region, so choose carefully
- Choose your Identity provider. You can Use:
- The built-in user database
- AWS Active Directory Connector
- AWS Managed Microsoft AD
- or an External SAML 2.0 Identity Provider like Azure AD or Okta
Multi-Factor Authentication
Let's quickly talk about Multi-Factor Auth with AWS SSO.
MFA can be enforced in three different ways:
- Context-Aware: This means if users suddenly come from a different device or location they will get prompted for MFA again
- Always-on: Kinda self explanatory but, users will always get prompted for MFA
- Never: You guessed it, they never get prompted for MFA
Users can also be allowed to self-enrol their MFA device, this allows you to let the users handle this process themselves.
MFA can be provided two different ways:
- Time-based One Time Password (TOTP) codes with your usual authentication apps like Google Authenticator, Microsoft Authenticator or Authy
- Optionally, you can use RADIUS MFA if your using the AD Connector or Managed Microsoft AD
If you are using an external identity provider like Azure AD, you will need to provide MFA via that provider.
How to setup AWS SSO with Azure AD
Firstly we need to go to the AWS Console on the master account and go to AWS Single Sign-On, this will present us with the AWS Single Sign-On Page.
Remember, this is a regional service, make sure your in the region you want AWS SSO to run from.
Enable AWS SSO

Now, if you don't see this and you got this page:
Your in a child account within the organization, you need to go to your master account.
Settings
Now that AWS SSO is enabled we can check out the settings page.
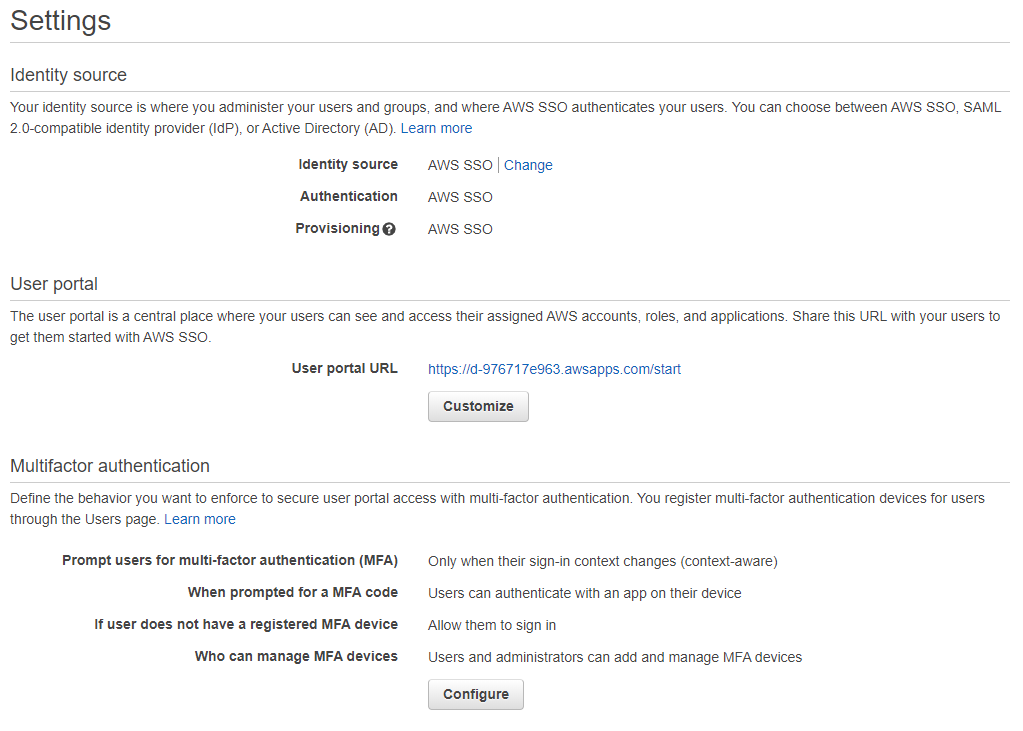
Here we can set our user portal URL, we can customize this once so make sure you set it to something you like the first time.
External Identity Provider
Because we are going to setup Azure AD, lets click Change next to the Identity source.
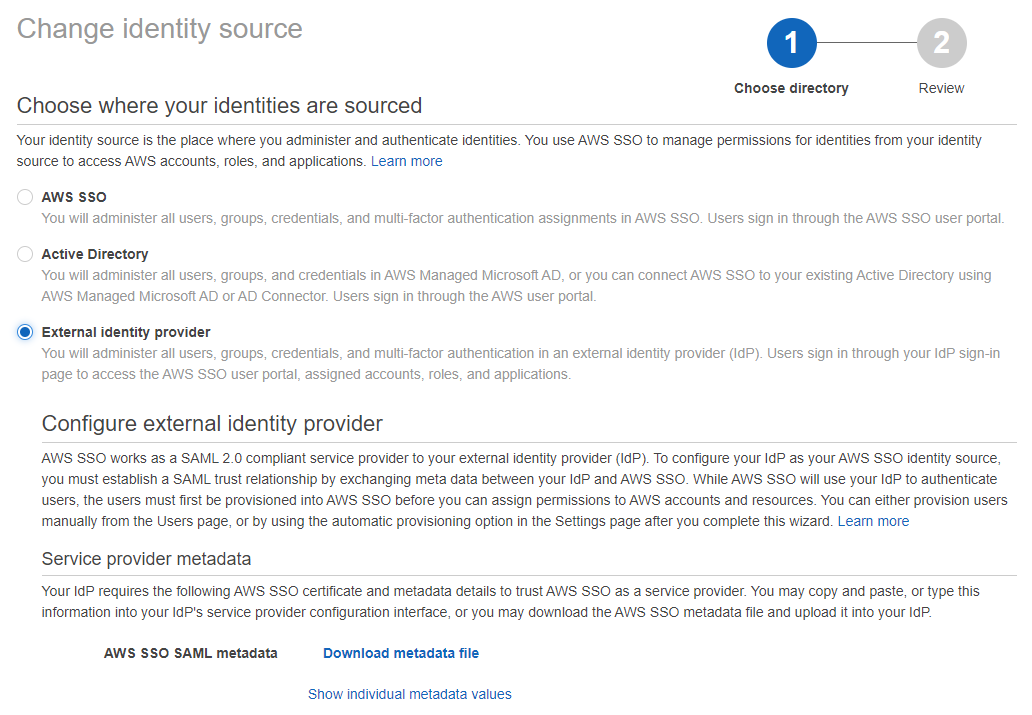
Here we are going to Select External identity provider and download the Metadata file.
Azure AD
Over to the Azure AD console (it won't bite).
One thing to note is that at this time is, integrating Azure AD with AWS SSO requires a non-gallery enterprise application to be configured. This means you will need an Azure AD Premium license for the users using AWS SSO. Hopefully AWS will publish an updated marketplace application so we can use the free Azure AD license.
New Enterprise Application
Firstly we need to create a new non-gallery application.
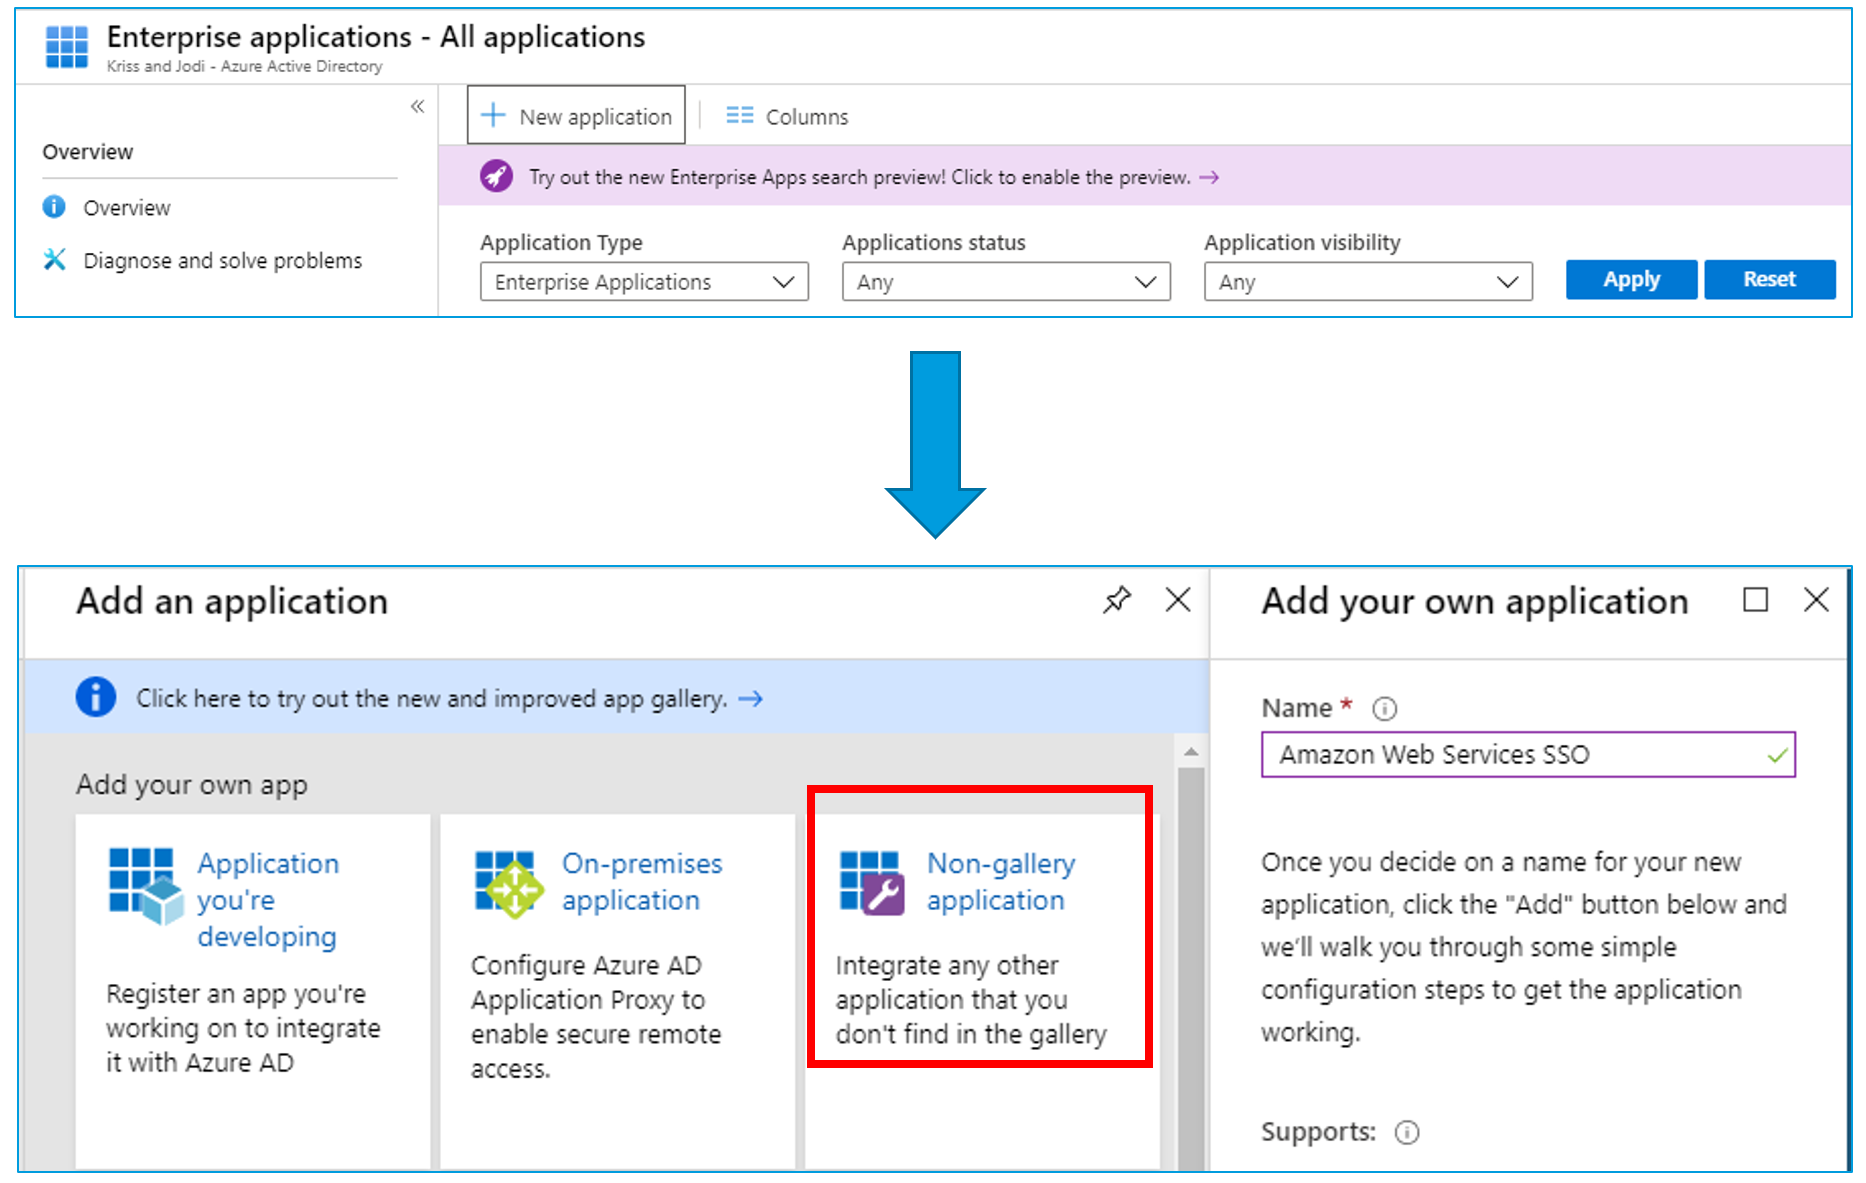
Upload a logo because we need to make everything look nice.

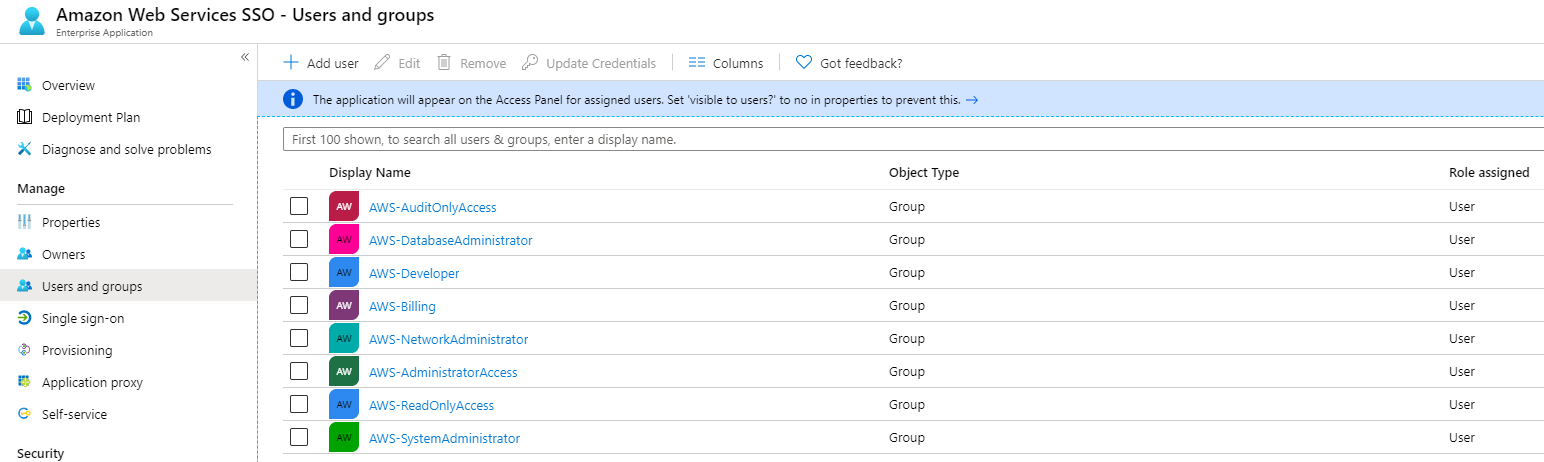
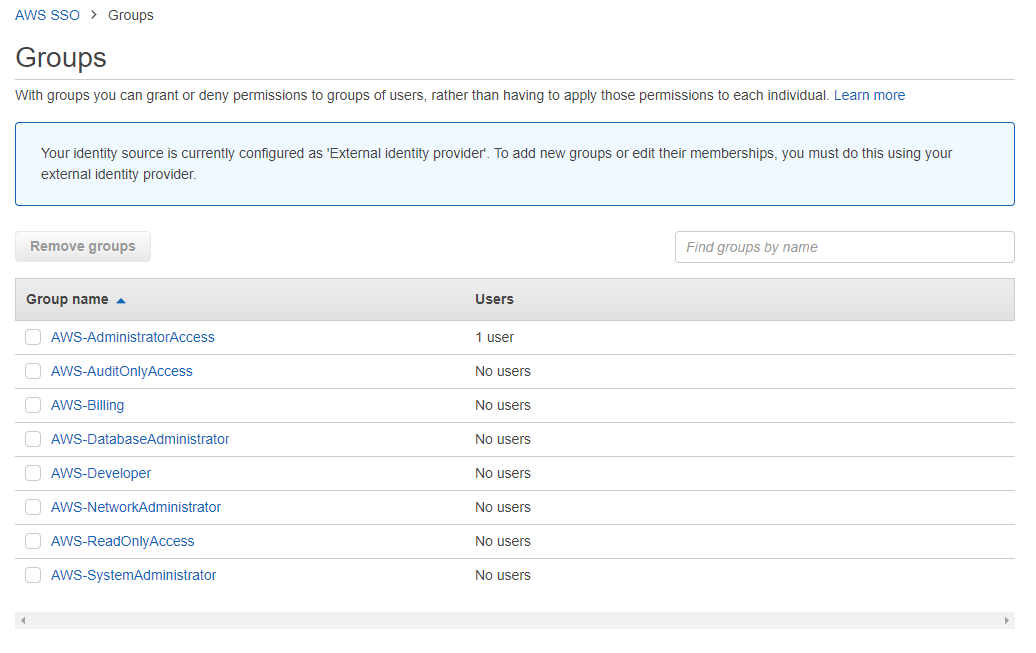
Users and Groups
Under Users and Groups, add all the users and groups you want to synchronise across to AWS SSO. This allows you to maintain the same level of Role Based Access Control your used to in your environment.
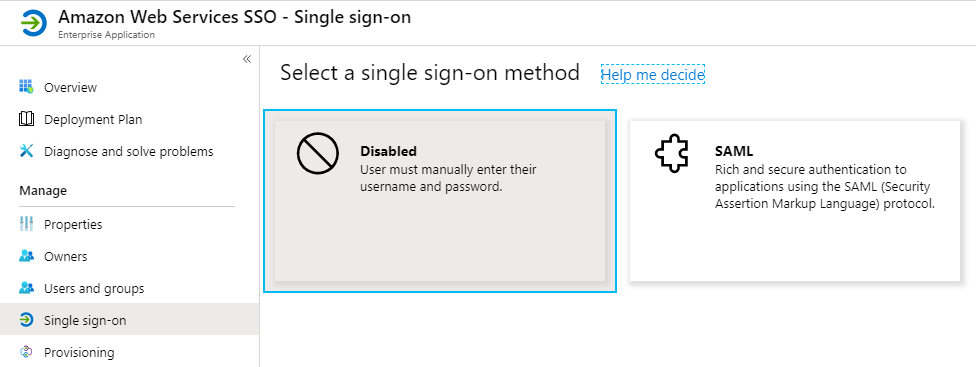
Complete the SAML process
Under Single sign-on in the enterprise app, select SAML.
Now we need to upload the Metadata file we got from the AWS SSO console and then download the Metadata file provided by Azure AD.
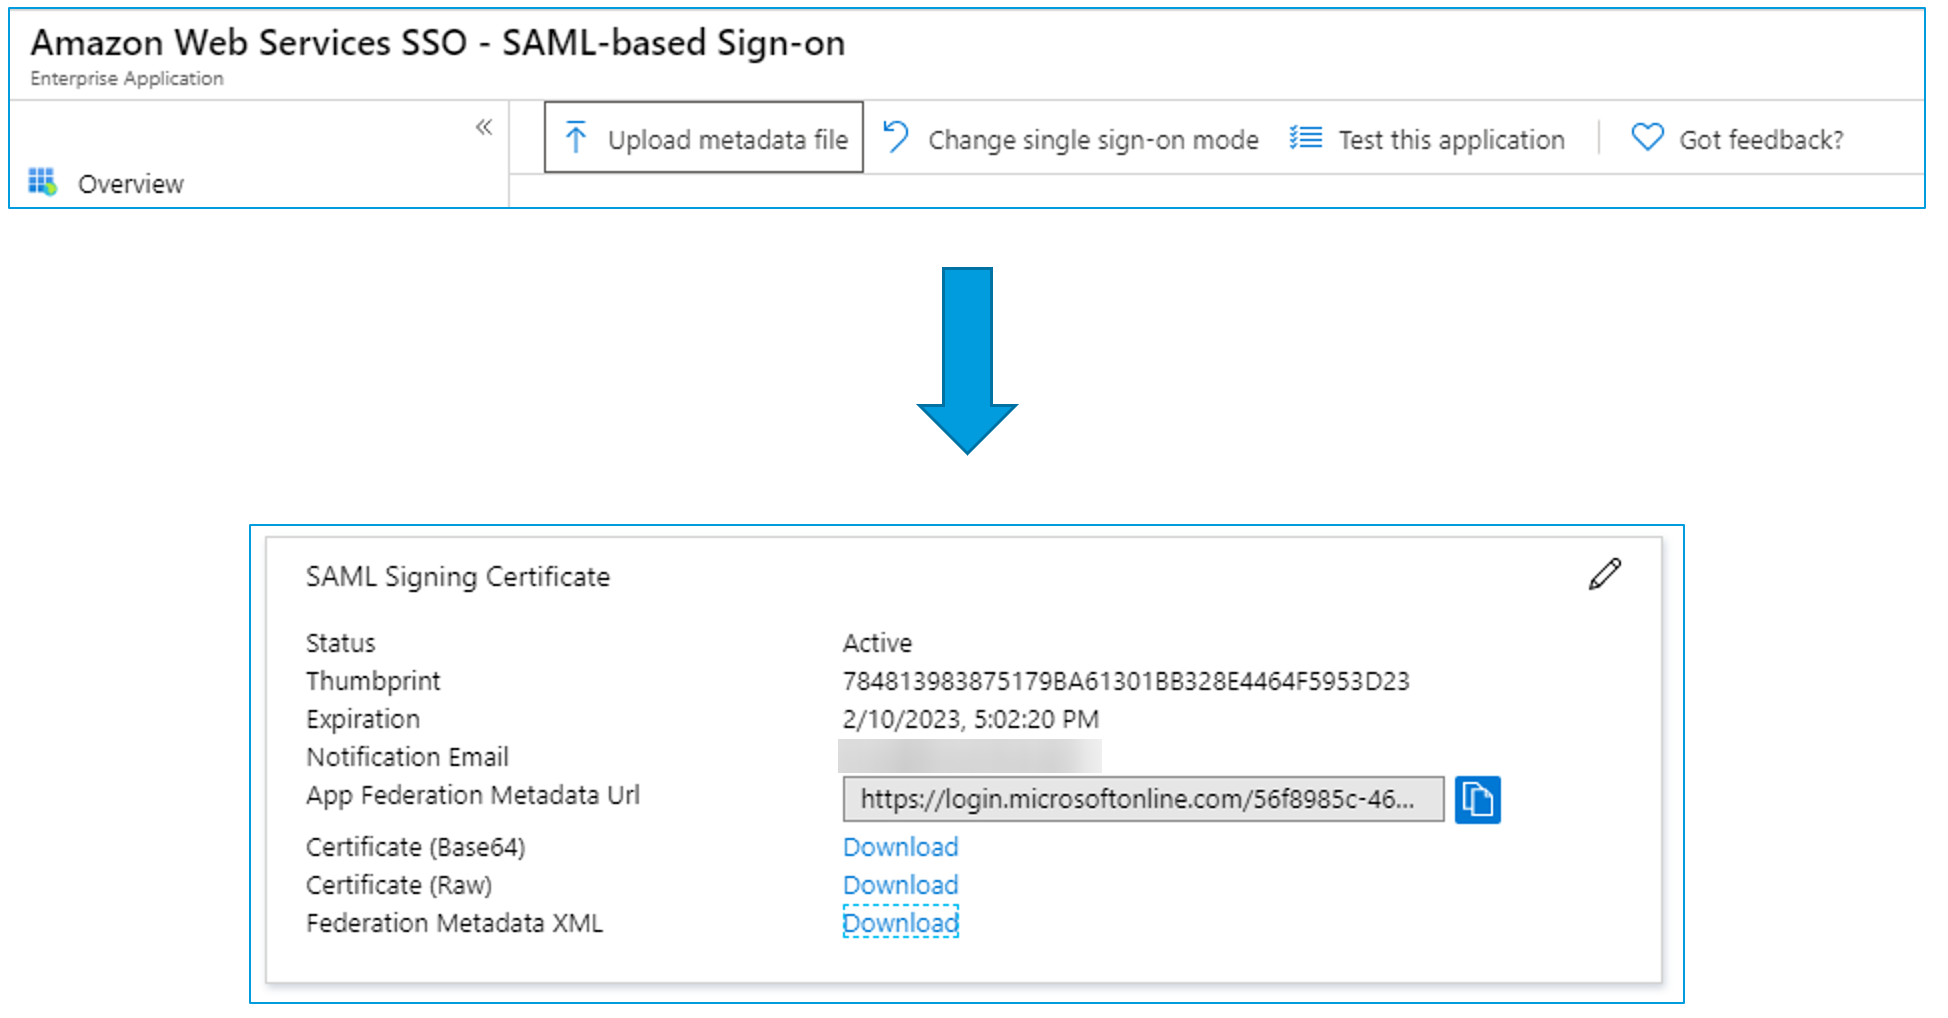
Back in the AWS SSO console, it will be waiting for us to upload the Identity provider metadata. We can now take the Metadata file we've just downloaded from Azure AD and upload it.
User Provisioning
Now that the SAML part is configured we are going to configure automatic user provisioning.
In AWS SSO, change user provisioning to automatic and copy the SCIM endpoint and Access token.

Back in the Azure AD console, change the provisioning mode to Automatic in the provisioning section of the enterprise app.
Then enter the SCIM endpoint in the Tenant URL section and the Access Token in the Secret Token field.
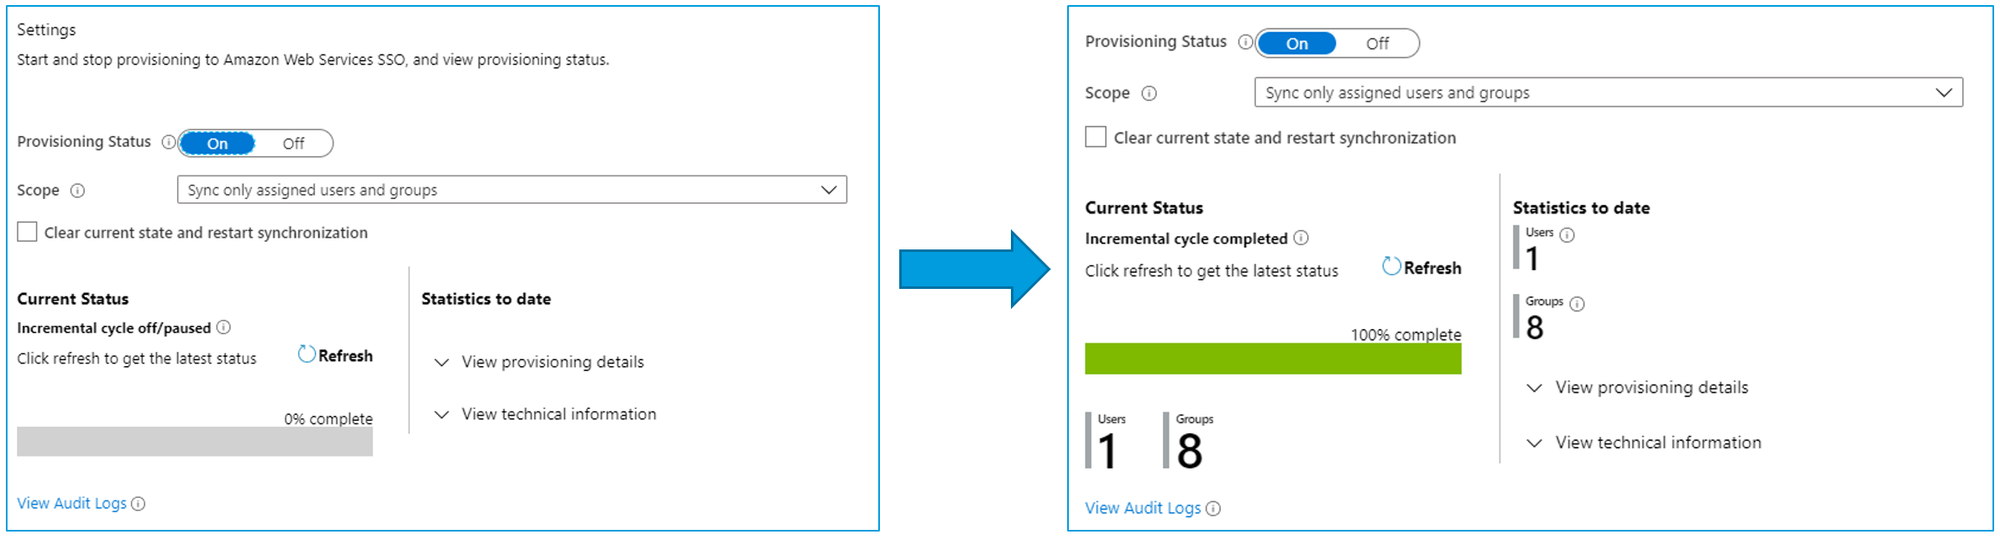
Now that this is configured, we can change the provisioning status to On. And wait and wait some more. This provisioning will take some time (usually 10-30 minutes)
But eventually you will see that all of your users and groups have been provisioned to AWS SSO.

User and Group Permissions
Now we can assign the synchronised users and groups access to your AWS accounts
Select the desired AWS accounts
Select the Azure AD Users and Groups to assign
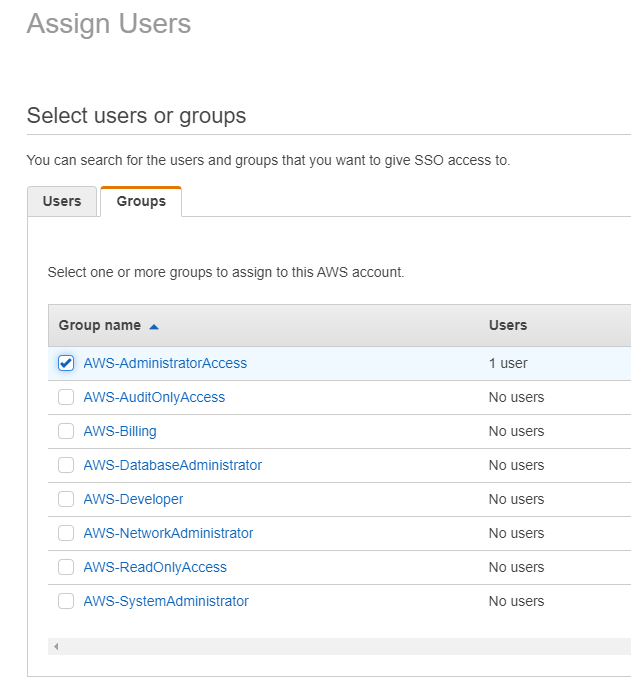
Select the permission sets to assign them
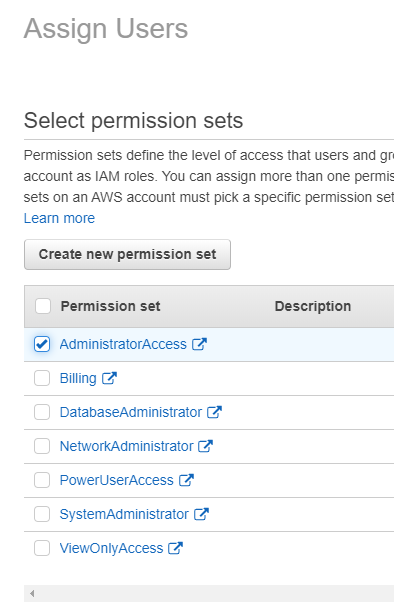
Permission Sets
Just so it all makes sense, here is a quick overview of Permission Sets:
- Permission sets are stored in AWS SSO and can be made up of multiple IAM policies
- These permission sets are then provisioned out to your AWS accounts in the organization
- This allows you to apply role-based access to users and groups
- Users can also be mapped to multiple permission sets
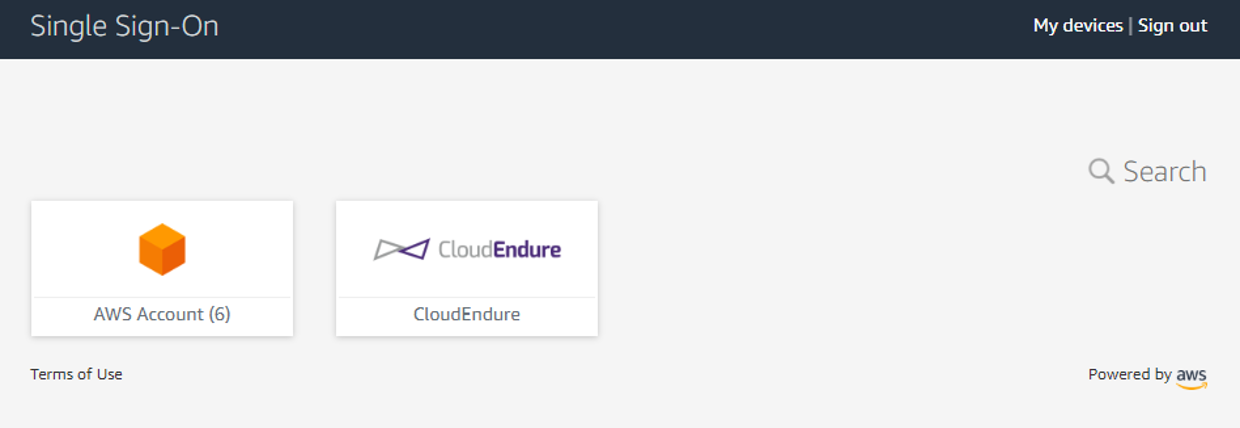
User Portal
Now that AWS SSO is all configured and we have our permissions we can now login. Once in we will be presented with the user portal showing our AWS accounts and applications we have access to.
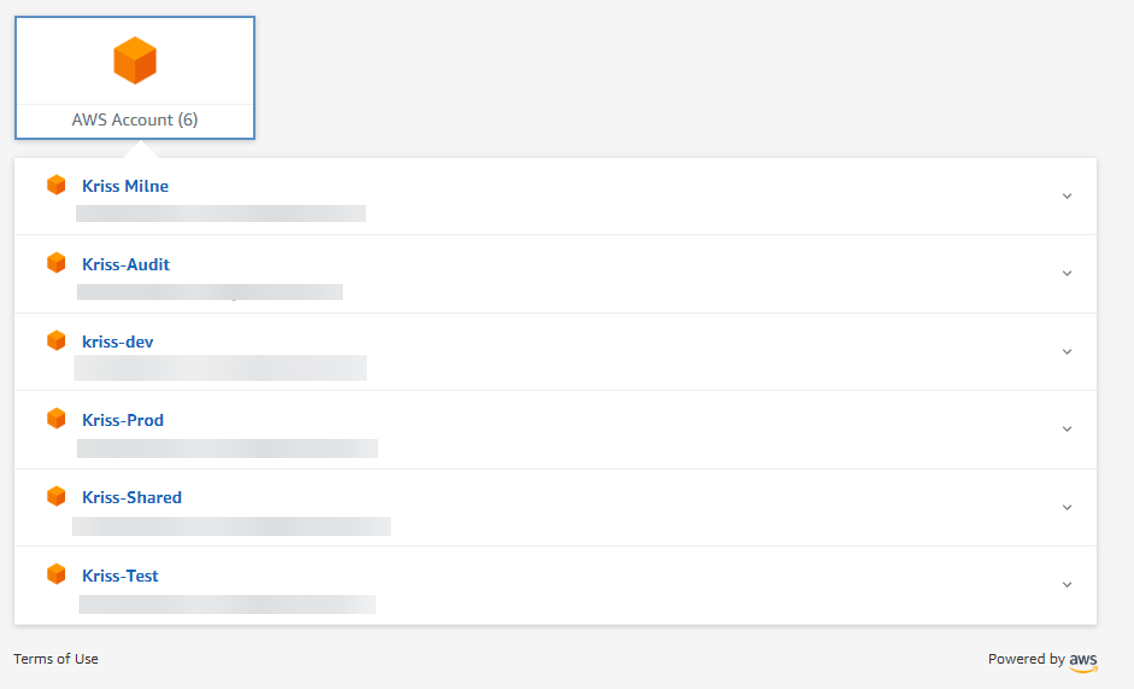
When we click on our AWS accounts we will be presented with the list of accounts we have access too
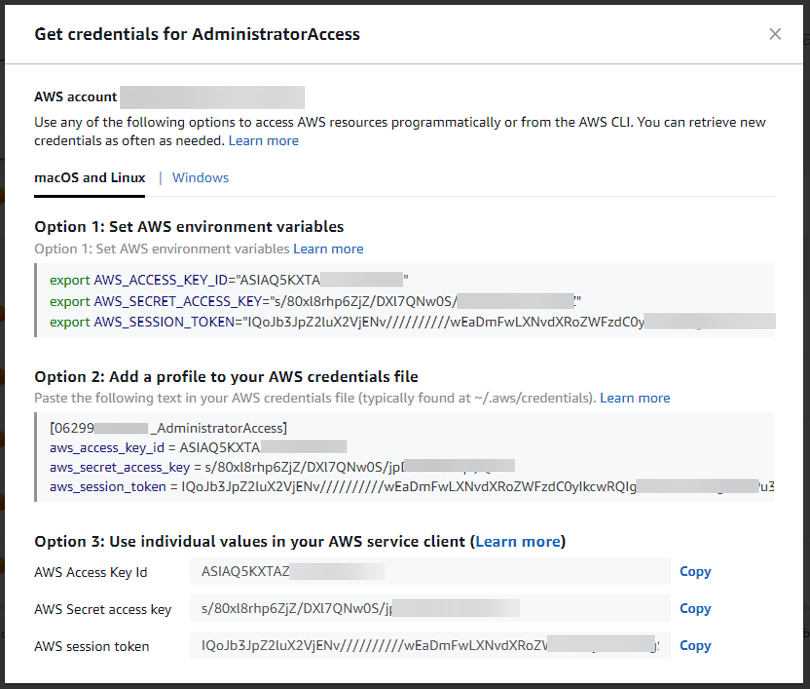
And automatically generated programmatic credentials.
Credits
This blog post is based off a presentation Kriss Milne and myself presented at the Brisbane AWS User Group.